Explore the art of fabric button crafting techniques in this comprehensive guide! Discover various methods for creating unique and beautiful fabric buttons, including stitching, covering, and embellishing techniques. Whether you’re a beginner or an experienced crafter, you’ll find valuable tips and inspiration to enhance your sewing projects. From choosing the right materials to mastering the finishing touches, this resource will equip you with the skills needed to elevate your fabric button crafting techniques. Unleash your creativity and start crafting today!
Understanding Fabric Buttons
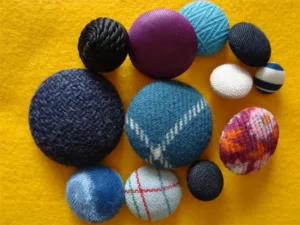
Fabric buttons are decorative fasteners made from fabric-covered materials, typically with a button shape. They can be made from a variety of materials, including cotton, silk, and linen. These buttons can serve both functional and aesthetic purposes, offering unique alternatives to traditional plastic or metal buttons.
Fabric buttons can be customized in countless ways, from color and pattern to shape and size. This versatility allows them to suit a wide range of applications, from garments and bags to home décor items like cushions and curtains. They can also be used in mixed media projects, scrapbooking, and more.
Choosing the Right Materials
Before diving into the crafting techniques, it’s essential to gather the right materials. The following is a list of items you’ll need for making fabric buttons:
- Fabric: Select your favorite fabric. Cotton works well due to its versatility and ease of handling, while silk can create a luxurious look.
- Button Forms: You can use pre-made button kits available in craft stores or create your forms using cardboard or plastic.
- Scissors: A good pair of fabric scissors is necessary for cutting the fabric.
- Needle and Thread: Choose thread that matches or complements your fabric. Hand sewing needles are typically sufficient, but if you plan on making many buttons, a sewing machine can save time.
- Fabric Glue: A fabric glue can help secure elements like embellishments or layers.
- Embellishments: Consider adding decorative elements such as beads, sequins, or lace to enhance the button’s design.
- Padding: For added texture, use foam or batting to create cushioned buttons.
Basic Fabric Button Crafting Techniques
There are several techniques to create fabric buttons, each offering unique characteristics and appearances. Below are some basic methods to get you started.
1. Basic Fabric-Covered Button
This is the simplest method for creating fabric buttons, perfect for beginners.
Materials Needed:
- Fabric
- Button kit (with forms and backings)
- Scissors
- Needle and thread
Steps:
- Cut the Fabric: Cut a circle of fabric about 1 inch larger than the button form. The extra fabric allows for folding over the edges to secure the button.
- Gather the Edges: Use a running stitch along the edge of the fabric circle. Make sure to keep the stitches loose enough to gather the fabric.
- Place the Button Form: Place the button form in the center of the fabric circle. Pull the thread to gather the fabric around the button.
- Secure the Fabric: Once the fabric is gathered snugly around the button form, tie off the thread securely.
- Attach the Backing: Follow the instructions of the button kit to attach the backing, which typically snaps into place.
- Finish: Trim any excess fabric if necessary, and your fabric-covered button is complete!
2. Padded Fabric Button
Padded fabric buttons have a soft, rounded appearance, perfect for giving your projects a more sophisticated look.
Materials Needed:
- Fabric
- Foam or batting
- Button form
- Needle and thread
- Scissors
Steps:
- Cut the Fabric: As with basic buttons, cut a fabric circle, but this time ensure the fabric is large enough to cover the padding and button form.
- Prepare Padding: Cut a piece of foam or batting slightly smaller than the fabric circle.
- Layering: Place the padding in the center of the fabric circle, followed by the button form on top.
- Gather the Edges: As before, stitch around the edges of the fabric circle to gather it around the padding and button form.
- Secure and Finish: Tie off the thread and attach the backing. The result will be a plush button with a lovely texture.
3. Fabric Button with Embellishments
Adding embellishments to your fabric buttons can elevate their design and make them truly unique.
Materials Needed:
- Fabric
- Embellishments (beads, sequins, etc.)
- Button form
- Needle and thread
- Scissors
Steps:
- Prepare Fabric: Cut your fabric circle as described previously.
- Attach Embellishments: Before gathering the fabric, sew or glue your chosen embellishments onto the fabric’s right side.
- Gather Edges: After securing the embellishments, gather the fabric edges around the button form.
- Finish: Complete the button as per the previous methods, ensuring that the embellishments are well secured.
Advanced Fabric Button Techniques
Once you have mastered the basic techniques, you can explore more advanced methods to enhance your button-making skills.
1. Reverse Fabric Button
This technique involves creating a button with a contrasting fabric on the back, making it suitable for reversible designs.
Materials Needed:
- Two fabric types (for front and back)
- Button form
- Needle and thread
- Scissors
Steps:
- Cut Two Circles: Cut two fabric circles, one for the front and one for the back, both large enough to cover the button form.
- Prepare the Front: Gather the edges of the first fabric circle and secure it to the button form.
- Attach the Back: Gather the edges of the second fabric circle and place it over the first, aligning the edges.
- Secure the Button: Tie off the threads and attach the backing as directed.
This technique creates a versatile button that can be flipped to show either fabric.
2. Shank Fabric Button
A shank button has a loop at the back, allowing it to sit higher off the fabric surface. This style is great for thicker fabrics or layers.
Materials Needed:
- Fabric
- Button shank
- Needle and thread
- Scissors
Steps:
- Cut the Fabric: As before, cut a circle of fabric large enough to cover the button form.
- Gather the Edges: Stitch around the circle to gather it, but leave enough thread length to create a shank.
- Attach the Shank: Place the button shank in the center of the gathered fabric before securing it to the button form.
- Secure and Finish: Gather the fabric around the button and secure it. Tie off the thread, and your shank button is ready to use.
Creative Uses for Fabric Buttons
Now that you know how to make fabric buttons, let’s explore some creative ways to incorporate them into your projects.
1. Clothing
Fabric buttons can replace traditional buttons on shirts, blouses, jackets, and coats. They offer a unique twist to any garment and can match or contrast with the fabric used.
2. Accessories
Use fabric buttons to embellish accessories like handbags, hats, and hair clips. They can add a personal touch that enhances the overall design of the accessory.
3. Home Décor
Fabric buttons can be used in various home décor projects, from cushion covers to curtain tiebacks. You can even create fabric button art by arranging buttons on a canvas to form patterns or images.
4. Craft Projects
Fabric buttons are perfect for various craft projects, including scrapbooking, card making, and mixed media art. They can add dimension and texture to your creations.
Tips for Successful Fabric Button Crafting
Here are some tips to ensure your fabric button crafting goes smoothly:
- Choose Quality Fabric: Use high-quality fabric to ensure durability and a polished finish.
- Experiment with Textures: Try different fabric types and textures to create diverse button designs.
- Practice Consistency: When making multiple buttons, practice measuring and cutting the fabric consistently to achieve uniformity.
- Use a Button Kit: Investing in a button kit can simplify the process and ensure a professional finish.
- Personalize Your Buttons: Don’t hesitate to add personal touches, such as embroidery or painting, to make your buttons unique.
Conclusion: Fabric button crafting techniques
Fabric button crafting is a fulfilling and creative endeavor that allows for endless possibilities. Whether you are a beginner or an experienced crafter, mastering various fabric button techniques will expand your skill set and enhance your projects. With the right materials and techniques, you can create beautiful fabric buttons that add personality and style to your creations.
As you embark on your fabric button crafting journey, remember to experiment with different fabrics, embellishments, and styles. Each button you create is a chance to express your creativity and make something uniquely yours. So gather your materials, unleash your imagination, and enjoy the art of fabric button crafting!