Discover The Art of Crafting Fabric Buttons with expert precision and creativity. From timeless designs to modern innovations, explore how fabric buttons enhance garments with unique textures and styles. Learn the meticulous process, from material selection to the finishing touches, that transforms simple fabrics into intricate buttons. Perfect for fashion enthusiasts and designers looking to add a distinctive touch to their creations. Unveil the craftsmanship behind every fabric button.
A Brief History of Fabric Buttons
The use of buttons dates back thousands of years, with evidence of their existence in ancient civilizations like the Indus Valley and Egypt. Early buttons were often ornamental, made from natural materials like bone, wood, or shell. It wasn’t until the 13th century in Germany that buttons started being used as fasteners for clothing.
Fabric buttons, in particular, gained popularity in the 18th and 19th centuries, especially in European fashion. During the Victorian era, the intricate detailing of fabric-covered buttons became a symbol of status and refinement. Tailors and dressmakers would meticulously handcraft these buttons to match or complement garments, often using luxurious fabrics like silk or velvet.
As industrialization took hold in the 20th century, machine-made buttons became more common, but the art of handcrafting fabric buttons never disappeared. Today, fabric buttons are a beloved feature in both haute couture and everyday fashion, valued for their customizability and artistic flair.
The Importance of Fabric Buttons in the Garment Industry
While buttons are often overlooked in the grand scheme of garment design, they serve both functional and decorative roles. A well-crafted button can transform a simple garment into something extraordinary, adding texture, color, and personality to the design. Fabric buttons are particularly versatile because they can be made to match the fabric of the garment, creating a seamless and cohesive look.
In the garment industry, fabric buttons are often used in high-end fashion, where attention to detail is paramount. They are commonly found on tailored jackets, dresses, blouses, and even accessories like hats and bags. Designers appreciate the ability to customize fabric buttons to fit the unique vision of their collections, whether they are looking for something understated and elegant or bold and eye-catching.
Additionally, fabric buttons are eco-friendly options compared to plastic or synthetic buttons. Many artisans and sustainable fashion brands are turning to fabric buttons as a way to reduce waste and promote environmentally conscious fashion. The materials used in fabric buttons are often biodegradable, and they can be crafted from scraps of fabric that would otherwise go to waste.
Materials Used in Crafting Fabric Buttons
Crafting fabric buttons requires a variety of materials, each contributing to the durability, appearance, and texture of the final product. Let’s explore some of the essential materials used in the process.
1. Fabric
The fabric is the star of the show when it comes to fabric buttons. Almost any type of fabric can be used, from cotton and linen to velvet and silk. However, certain fabrics work better than others depending on the type of button you want to create. Thicker fabrics like wool and denim create sturdy, textured buttons, while thinner fabrics like silk or chiffon produce delicate, smooth buttons.
If you are creating buttons for a specific garment, it’s common practice to use the same fabric as the clothing. However, contrasting fabrics can also create a visually appealing effect.
2. Button Blanks
Button blanks are the foundation upon which fabric buttons are made. These are typically made of metal or plastic and come in various shapes and sizes. Button blanks provide the structure and stability for the fabric, ensuring that the button retains its shape even with regular use.
The most common types of button blanks include:
- Shank Buttons: These have a small loop or shank on the back for sewing onto garments.
- Flat Buttons: These have a flat back and are sewn through holes drilled in the button.
- Cover Buttons: These are specifically designed to be covered with fabric and have a removable back plate to secure the fabric in place.
3. Interfacing
Interfacing is a material used to provide extra stability and structure to the fabric before covering the button blank. It is especially useful when working with delicate fabrics that might otherwise fray or stretch. Interfacing comes in various weights, from light to heavy, and can be either fusible (iron-on) or sew-in. Fusible interfacing is often preferred because it bonds to the fabric with heat, making the process quicker and easier.
4. Thread
Thread is an essential material for sewing the fabric onto the button blank and attaching the button to the garment. The thread should be strong and durable to withstand the wear and tear of regular use. For a seamless look, the thread color should match the fabric, but contrasting thread can also create a decorative effect.
5. Needle
A fine, sharp needle is necessary for sewing the fabric and interfacing onto the button blank. Depending on the thickness of the fabric and button blank, different sizes of needles may be required. For delicate fabrics, a thinner needle will prevent snagging and damage, while a thicker needle is needed for heavier fabrics like wool or denim.
6. Scissors
Sharp fabric scissors are essential for cutting fabric and interfacing to the correct size. Precision is key when cutting the fabric for fabric buttons, as any jagged edges or uneven cuts will be visible once the fabric is stretched over the button blank.
7. Fabric Glue (Optional)
Fabric glue can be used to secure the fabric onto the button blank, especially when working with slippery or delicate fabrics. While not always necessary, fabric glue can be a helpful tool in ensuring that the fabric stays in place while sewing.
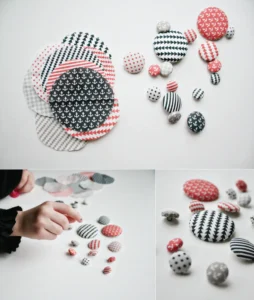
Step-by-Step Guide to Crafting Fabric Buttons
Now that we’ve covered the materials needed, let’s dive into the process of crafting fabric buttons. This step-by-step guide will take you through the entire process, from selecting the fabric to sewing the finished button onto a garment.
Step 1: Select Your Fabric and Button Blank
The first step in crafting fabric buttons is selecting the fabric and button blank you want to use. Consider the overall look you want to achieve, as well as the fabric of the garment the button will be attached to. If you’re looking for a cohesive design, choose a fabric that matches the garment. For a more playful or eclectic look, you can opt for a contrasting fabric that adds visual interest.
Once you’ve selected your fabric, choose a button blank that complements the size and style of the fabric. Button blanks come in a variety of sizes, so be sure to choose one that is appropriate for the garment you’re working on.
Step 2: Cut the Fabric and Interfacing
Next, use fabric scissors to cut a piece of fabric that is large enough to cover the entire button blank with some extra fabric around the edges. The size of the fabric will depend on the size of the button blank. A general rule of thumb is to cut the fabric about twice the diameter of the button blank.
If you’re using interfacing, cut a piece of interfacing to the same size as the fabric. If the fabric you’re working with is thick or stiff, you may not need interfacing, but for thinner or more delicate fabrics, interfacing will provide the extra stability needed.
Step 3: Attach the Interfacing to the Fabric
If you’re using fusible interfacing, place the interfacing on the wrong side of the fabric and use an iron to press it in place. Be sure to follow the manufacturer’s instructions for fusing the interfacing to the fabric. If you’re using sew-in interfacing, simply place it on the wrong side of the fabric, and it will be secured in the next step when the fabric is sewn onto the button blank.
Step 4: Sew the Fabric onto the Button Blank
Place the button blank in the center of the fabric, with the right side of the fabric facing out. Wrap the fabric around the button blank, pulling it tight to ensure that there are no wrinkles or folds in the fabric.
Using a needle and thread, sew a running stitch around the edge of the fabric, pulling the thread tight to gather the fabric around the button blank. This will create a smooth, taut surface on the front of the button. Be sure to secure the fabric tightly so that it doesn’t shift or come loose over time.
Step 5: Secure the Back of the Button
Once the fabric is securely gathered around the button blank, place the back plate of the button blank (if using a cover button) onto the back of the button. This will hold the fabric in place and create a finished look on the back of the button.
If you’re not using a cover button, simply tie off the thread and trim any excess fabric or thread from the back of the button.
Step 6: Attach the Button to the Garment
The final step is to sew the finished fabric button onto the garment. If you’re using a shank button, sew the button through the shank onto the garment using a strong thread. If you’re using a flat button, sew the button through the holes in the button blank and onto the garment.
Be sure to sew the button securely so that it can withstand regular use. For added durability, you can sew the button on with a small piece of fabric or interfacing behind the garment to reinforce the area where the button is attached.
Creative Designs and Uses for Fabric Buttons
Fabric buttons offer endless possibilities for creative design. Beyond their functional use as fasteners, fabric buttons can be used as decorative elements on garments, accessories, and even home decor. Here are some creative ideas for incorporating fabric buttons into your designs:
1. Embellishments on Clothing
Fabric buttons can be used as decorative embellishments on clothing, even if they don’t serve a functional purpose. For example, you can add fabric buttons to the cuffs of a jacket, the collar of a blouse, or the pockets of a dress for an extra touch of detail.
2. Jewelry
Fabric buttons can be transformed into unique pieces of jewelry, such as earrings, necklaces, or brooches. By attaching fabric buttons to jewelry findings or chains, you can create one-of-a-kind accessories that reflect your personal style.
3. Home Decor
Fabric buttons can be used to add a personalized touch to home decor items like pillows, curtains, or upholstered furniture. By using fabric buttons made from coordinating fabrics, you can create a cohesive and stylish look in your home.
4. Hair Accessories
Fabric buttons can be attached to hairbands, clips, or barrettes to create custom hair accessories. This is a great way to add a pop of color or texture to your hairstyle, especially for special occasions.
5. Bags and Purses
Fabric buttons can be used as closures or decorative elements on bags and purses. Whether you’re designing a tote bag, clutch, or backpack, fabric buttons can add a unique and handmade touch to your design.
Conclusion: The Art Of Crafting Fabric Buttons
The art of crafting fabric buttons is a timeless and versatile skill that allows for endless creativity and personalization. Whether you’re a professional tailor, a hobbyist seamstress, or a fashion enthusiast, fabric buttons offer a unique way to elevate your designs and add a personal touch to your garments and accessories. By mastering the techniques and tools involved in crafting fabric buttons, you can create custom, one-of-a-kind pieces that stand out from the crowd and reflect your individual style.